Those of you who know me, know that I can be a proponent for the Mac computer (understatement?), even though most of the accessibility we've used in the past has been Windows-only software. Well, times they are a-changing, slowly but surely.
Here's a link to some great, easy to understand, explanations on how to make Mac with OSX more accessible. The website is about accessibility for the Apple and Mac, and has some great articles on new applications and news items.
Check it out at http://atmac.org/series/mac-accessibility-101/
Not all of the articles are specific to the field of visual impairment, but it's been great to read that there are people out there who are trying to make the Internet specifically, and the computer generally, accessible to people with disabilities. Sooner or later, we'll all need to take advantage of some of these adaptations, so support the movement for Web Accessibility by reading and talking about it with your friends. As President-Elect Obama (and I'll be changing that to President Obama as of tomorrow!) has said, "Change is Coming." Embrace it!!
Monday, January 19, 2009

Monday, December 8, 2008
More Keyboard Shortcuts
For those of you who are practicing a getting into using keyboard shortcuts instead of the mouse, check this out. I got this link by listening to the NosillaCast Podcast (thank you Allison for a wealth of information!). Go to http://www.keyxl.com/ to find keyboard shortcuts for many popular applications, including Microsoft Powerpoint. I've only just started looking through the site, but it seems pretty comprehensive. There are keyboard shortcuts for Google apps, mp3 programs, and more.
Sunday, November 16, 2008
Adding Captions to Videos
Well, I always learn a lot when I go to technology workshops. Yesterday, I went to CUELA (Computer Using Educators Los Angeles). I attended some great workshops about Google Earth and Sketchup; two free applications you can download at Google's website. In the afternoon, I attended a workshop about using iPods in the classroom. I got some wonderful resources, but one of the other benefits of attending was talking with some really tech-savvy computer users. One of the workshop organizers shared a great website to help add captions or translations onto your videos (thank you, Matthew!). I went to check it out, and within about 30 minutes, I'd finished captioning my first video. This video segment was filmed in 2004, and showed one of my students explaining how she reads and organizes her braille books. This might be useful for teachers to show to classroom teachers to help them understand the space requirement for those braille books. Check out the video, then go to http://dotsub.com to see how you can caption or translate videos yourself!
Saturday, November 1, 2008
Tutorial on Creating a Keyboard Shortcut to Applications
Click on the link below to go to a step-by-step tutorial on how to create a desktop keyboard shortcut. Note that this is a very visual pdf file.
Creating a Keyboard Shortcut to JAWS
Here are the text directions:
Creating a Keyboard Shortcut to JAWS
Here are the text directions:
This is the procedure for how to add a desktop keyboard shortcut for JAWS.
1. Select Programs
(1) Press Start Menu and then (2) select All Programs (or Programs, depending on your version of Windows).
2. Select JAWS
Press 'j' for JAWS (if you have more than one J program, keep pressing 'j' until JAWS is highlighted).
3. Select the JAWS Icon
Press Enter and then press the down arrow until JAWS is highlighted.
4. Right-click [press Applications key] on Properties
Press the Applications Key (key on keyboard that looks like a lined piece of paper with an arrow pointing to the paper). Press the up or down arrow to move to Properties; press Enter.
5. Press the Keys to Create the Shortcut
Press the Tab key to move to "Shortcut key" field; press the Control key and the letter J on your keyboard (the Alt will be added by the computer).
6. Apply the Shortcut
(1) Tab to Apply and press Enter to apply your change; (2) Tab to OK and press Enter.
7. Create a Desktop Shortcut
Repeat Steps 1-3; press Applications key and down-arrow to Send To; press Enter and down-arrow to Desktop (create shortcut); press Enter. Press Esc until you're back at your Desktop.
8. Start JAWS Using Keyboard Shortcut
You should now see a JAWS icon on the desktop. If you press and hold the Ctrl and Alt keys, and press 'j', JAWS should start up (be patient, it may take a moment or two).
You can create desktop keyboard shortcuts for other programs (Microsoft Word, Internet Explorer, etc.), following the same procedure. Good luck!
Saturday, September 20, 2008
Link to Listening Skills -- Ideas for Teaching
Here's a great website for ideas in teaching listening skills to your students. Has activity ideas, lesson plans, etc. You can search by grade level range (e.g., K-2, 3-5, through high school age). To access the lessons and other great ideas, you need to register, but it's free. Check it out at:
http://www.learningthroughlistening.org/Classroom-Teaching-Tools/25/
http://www.learningthroughlistening.org/Classroom-Teaching-Tools/25/
Monday, March 3, 2008
Online Typing Programs
Sometimes you may be working with a student on a computer that doesn't have a keyboarding program. Well, if you can use the computer to get to the Internet, then your student may be able to practice his/her typing skills. Try some of the links below, and let me know if any of them work for you. Note that in order for these websites to be accessible for students with low vision, you may need to use either Magnifier/Zoomtext on a PC or Zoom on a Mac. None of these programs provide any speech output, so they wouldn't be good alternatives for students with very limited or no vision.
1. Good basic typing program that shows accuracy and speed, as well as listing the errors. This is the link to lesson 1, but look on the left side, and you'll see other lesson links: Type Online
2. Links to several alternatives for typing: Keyboarding
3. A fun typing program for 2nd-4th graders (Note that characters have English accents): Dance Mat Typing
4. This site has online typing practice; gives speed and accuracy as the student is typing. No lessons per se; has real and nonsense words that assumes the typist already is familiar with touch-typing on a QWERTY keyboard. Typing at the speed of thought
If you'd like your high school student to get a little more practice typing, here's a link to Winter Concert, Across the Universe, and to Heath Ledger story (thanks Ruth, for the documents).
1. Good basic typing program that shows accuracy and speed, as well as listing the errors. This is the link to lesson 1, but look on the left side, and you'll see other lesson links: Type Online
2. Links to several alternatives for typing: Keyboarding
3. A fun typing program for 2nd-4th graders (Note that characters have English accents): Dance Mat Typing
4. This site has online typing practice; gives speed and accuracy as the student is typing. No lessons per se; has real and nonsense words that assumes the typist already is familiar with touch-typing on a QWERTY keyboard. Typing at the speed of thought
If you'd like your high school student to get a little more practice typing, here's a link to Winter Concert, Across the Universe, and to Heath Ledger story (thanks Ruth, for the documents).
Saturday, March 1, 2008
Link to Abacus Lessons
Although the page hasn't been updated in awhile, here's where to find some Abacus podcasts, as well as a few other good links about braille. Check it out:
http://lore.schindler.googlepages.com
http://lore.schindler.googlepages.com
Friday, February 8, 2008
BrailleNote Wiki Offers Support

One of our very tech-savvy high school students has created a fantastic wiki about the BrailleNote. Stop by and check it out at http://braillenote.pbwiki.com
The site offers support in everything from creating a document to connecting to the Internet, from BrailleNote Basics to Behind the Scenes.
Thursday, December 6, 2007
Directions to Download Web Braille Books
The National Library Service offers many wonderful resources, including e-braille books, known as Web Braille. Here are the steps to follow to locate braille books in electronic format. Before you can download any Web Braille books, you need to call your local Braille Institute library to get an account. The staff in the library have been wonderful, so give them a call (go to www.brailleinstitute.org for more information about library services).
1. Go to the National Library Service website: www.loc.gov/nls
2. Click on Search the Catalog.
Hopefully you have a book title or author’s name in mind as you’re searching. Let’s use an example (thank you Mrs. Tomlinson and Jesus for the great idea--I love the Lemony Snicket books, too!). Author: snicket lemony
3. Tab to the field “Keyword” and type in web braille
4. Tab to the field “Material Type” and choose Braille (for those using a screenreader there is an arrow in this field, so use your arrow keys to hear the choices).
5. Tab to Search and press enter/return.
6. If there are web braille books available, your query results will list how many are available. For my example of Lemony Snicket, there were 13 results listed. The author and title of each book is displayed along with information about the publisher, book number and volume. Next, you should notice a link that starts with "http". This is the actual link to download the e-braille book. If you’d like a short description of the book before you download it, then click on “More on this record” and the next page will give more information, including “Notes,” that provides a summary of the book.
7. To download the e-braille book, click on the “http” link. At this point, the computer will prompt you for your username and password as authentication. You should already have this information that you got from calling your local Braille Institute library to set up an account. Type in your username and password, then press enter. NOTE: The next page is the Web Braille Agreement information. Please read this and understand that under Fair Use Laws, a braille reader is entitled to download this book for his or her own use. Discuss the meaning of the agreement with your students/teachers.
8. Click on the appropriate option: I Accept, Best for PC users will download the book to your computer.
A dialog box will appear, asking whether you want to save or open the file. Click on Save.
9. Here is a very important step. The computer keeps track of files by number, but if you want to know which book you’re downloading later, make sure you change the name to something you’ll remember. If it’s more than one volume, type the title or part of the title followed by the volume number. Example: I’m downloading The Grim Grotto, which is two volumes, so I type: Grim Grotto1 for my first volume. Next, I find my Web Braille folder that I created on my computer Desktop, and then click Save to save the volume in that folder. The file should download quickly. To get the next volume, press backspace to go back to the page with the links, then click on the next volume, save it as Grim Grotto2, and click Save.
10. You can now transfer the book to your book reader, or open it in a braille translation program such as Braille2000 or Duxbury, and emboss the book.
Good luck, and post a comment about your successes or problems. Happy Reading!
1. Go to the National Library Service website: www.loc.gov/nls
2. Click on Search the Catalog.
Hopefully you have a book title or author’s name in mind as you’re searching. Let’s use an example (thank you Mrs. Tomlinson and Jesus for the great idea--I love the Lemony Snicket books, too!). Author: snicket lemony
3. Tab to the field “Keyword” and type in web braille
4. Tab to the field “Material Type” and choose Braille (for those using a screenreader there is an arrow in this field, so use your arrow keys to hear the choices).
5. Tab to Search and press enter/return.
6. If there are web braille books available, your query results will list how many are available. For my example of Lemony Snicket, there were 13 results listed. The author and title of each book is displayed along with information about the publisher, book number and volume. Next, you should notice a link that starts with "http". This is the actual link to download the e-braille book. If you’d like a short description of the book before you download it, then click on “More on this record” and the next page will give more information, including “Notes,” that provides a summary of the book.
7. To download the e-braille book, click on the “http” link. At this point, the computer will prompt you for your username and password as authentication. You should already have this information that you got from calling your local Braille Institute library to set up an account. Type in your username and password, then press enter. NOTE: The next page is the Web Braille Agreement information. Please read this and understand that under Fair Use Laws, a braille reader is entitled to download this book for his or her own use. Discuss the meaning of the agreement with your students/teachers.
8. Click on the appropriate option: I Accept, Best for PC users will download the book to your computer.
A dialog box will appear, asking whether you want to save or open the file. Click on Save.
9. Here is a very important step. The computer keeps track of files by number, but if you want to know which book you’re downloading later, make sure you change the name to something you’ll remember. If it’s more than one volume, type the title or part of the title followed by the volume number. Example: I’m downloading The Grim Grotto, which is two volumes, so I type: Grim Grotto1 for my first volume. Next, I find my Web Braille folder that I created on my computer Desktop, and then click Save to save the volume in that folder. The file should download quickly. To get the next volume, press backspace to go back to the page with the links, then click on the next volume, save it as Grim Grotto2, and click Save.
10. You can now transfer the book to your book reader, or open it in a braille translation program such as Braille2000 or Duxbury, and emboss the book.
Good luck, and post a comment about your successes or problems. Happy Reading!
Sunday, November 11, 2007
Share Your Bookmarks using Del.icio.us
Del.icio.us is a social bookmarking website. What is "social bookmarking," you ask? Well, first of all, it's a way to save your favorite websites in a central place on the web, where you can access them from whatever computer you're sitting in front of. But the real power of social bookmarking comes in being able to share your bookmarks with others, and in finding new resources through other people's bookmarks. There are several social bookmarking websites, but here are the directions for Del.icio.us:
1. Go to www.delicious.com
2. Click on Register (top right link between Login and Help).
3. Create a username and password. Your username will be the name through which people will be able to locate your bookmarks.
4. Once you've registered, click on the Help button, and look for 'Bookmarking--install the tools for saving bookmarks.' There are links for installing the tools for Internet Explorer, Firefox, and "bookmarklet buttons for any browser" (e.g., Safari). After running the two installers, you should find two new buttons on your browser toolbar.
5. Now go to it! Whenever you find a great website you'd like to remember, click on your Tag button, and you'll see a new window that has the URL listed for you--type in a description if you want, and then type in tags (category words) and click on Save. The tags will really help you find/organize your bookmarks later.
Here's the URL to part of my Del.icio.us bookmarks: http://del.icio.us/VIAccessible/accessibility
Check it out and browse the links I've discovered so far. When you have some sites to share, give us your Del.icio.us name by posting a comment to this blog.
1. Go to www.delicious.com
2. Click on Register (top right link between Login and Help).
3. Create a username and password. Your username will be the name through which people will be able to locate your bookmarks.
4. Once you've registered, click on the Help button, and look for 'Bookmarking--install the tools for saving bookmarks.' There are links for installing the tools for Internet Explorer, Firefox, and "bookmarklet buttons for any browser" (e.g., Safari). After running the two installers, you should find two new buttons on your browser toolbar.
5. Now go to it! Whenever you find a great website you'd like to remember, click on your Tag button, and you'll see a new window that has the URL listed for you--type in a description if you want, and then type in tags (category words) and click on Save. The tags will really help you find/organize your bookmarks later.
Here's the URL to part of my Del.icio.us bookmarks: http://del.icio.us/VIAccessible/accessibility
Check it out and browse the links I've discovered so far. When you have some sites to share, give us your Del.icio.us name by posting a comment to this blog.
Saturday, November 10, 2007
Changing WindowsXP Display for Low Vision Users
In my last post, I explained how to change the mouse pointer size in WinXP. Here are some other things you can do to enlarge the desktop without specialized software.
I want to preface these tips by saying that software such as Zoomtext or MAGic are wonderful products to help students who have limited vision access the computer screen. But, what happens for these students when they go home, to the local library, or other places that do not have computers equipped with these software programs? While some students may need the features and screen enlarging capability of specialized screen enlarging programs, other students may be able to access the computer just fine with these "free" alternatives.
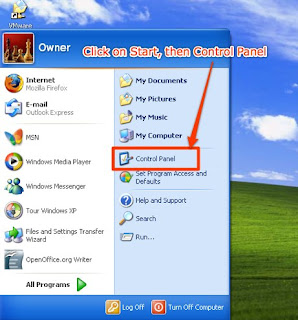
To enlarge the desktop font:
1. Open the Control Panel in Windows XP.
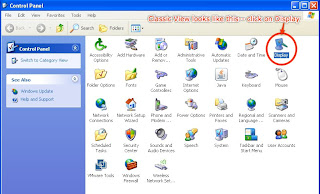
2. Click on Display (in Classic View).
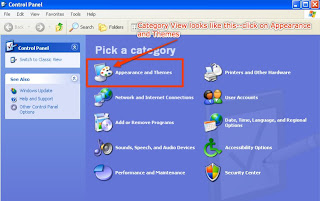
In Category View, first click Appearances and Themes:
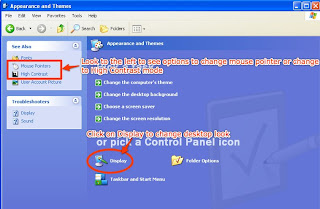
Then click Display: (Note that in Appearances and Themes, you'll see links to Mouse Pointer and High Contrast, described in previous posts.)
3. In Display, choose the Appearance tab, change the Font size to Extra Large Fonts, click Apply to see how the desktop has changed. Next, click the Advanced button (above Apply).
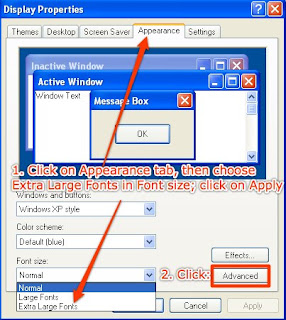
4. Here's where you can experiment with the Windows menu items. Click on Items, then choose Icon and change the font to 16 point. Click on OK, then Apply, and see what that may have changed on the desktop. Click on Items--Menu, or Items--Message Box, and change the font size for those, as well. Click on Apply after each to see how it has changed text size in various windows. Go ahead and explore some of the other Items to see what happens when you change the font size, or change the Font itself (Tahoma seems to be the default font).
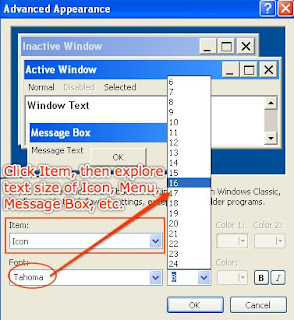
Hopefully, some of these simple and free alterations to the desktop will enable your student to see the basic fonts and menu items to get into programs. From there, he/she may be able to use Windows Magnifier (described in a previous post), to access applications such as Wordpad, the Internet, etc. I'd love to hear comments on this or other suggestions you have to make the computer more accessible to persons with visual impairments.
I want to preface these tips by saying that software such as Zoomtext or MAGic are wonderful products to help students who have limited vision access the computer screen. But, what happens for these students when they go home, to the local library, or other places that do not have computers equipped with these software programs? While some students may need the features and screen enlarging capability of specialized screen enlarging programs, other students may be able to access the computer just fine with these "free" alternatives.
To enlarge the desktop font:
1. Open the Control Panel in Windows XP.

2. Click on Display (in Classic View).

In Category View, first click Appearances and Themes:

Then click Display: (Note that in Appearances and Themes, you'll see links to Mouse Pointer and High Contrast, described in previous posts.)

3. In Display, choose the Appearance tab, change the Font size to Extra Large Fonts, click Apply to see how the desktop has changed. Next, click the Advanced button (above Apply).

4. Here's where you can experiment with the Windows menu items. Click on Items, then choose Icon and change the font to 16 point. Click on OK, then Apply, and see what that may have changed on the desktop. Click on Items--Menu, or Items--Message Box, and change the font size for those, as well. Click on Apply after each to see how it has changed text size in various windows. Go ahead and explore some of the other Items to see what happens when you change the font size, or change the Font itself (Tahoma seems to be the default font).

Hopefully, some of these simple and free alterations to the desktop will enable your student to see the basic fonts and menu items to get into programs. From there, he/she may be able to use Windows Magnifier (described in a previous post), to access applications such as Wordpad, the Internet, etc. I'd love to hear comments on this or other suggestions you have to make the computer more accessible to persons with visual impairments.
Thursday, October 25, 2007
Changing the Mouse Pointer Size
Here's another little tip to help students with low vision to access the computer display without spending extra money on specialized software. Windows XP actually has quite a few built in features that allow anyone to change how the desktop looks.
Try these steps:
1. Click on Start button at the bottom of the screen. Move up to Settings, then to Control Panel and click. You should now see a window with many icons, including "Mouse":
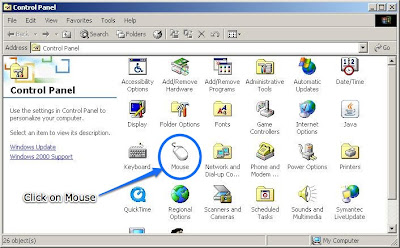
2. Click on Mouse, then look for the tab Pointers.
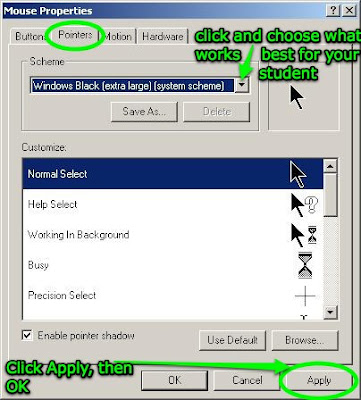
3. Click on the down arrow under Scheme, then choose the pointer configuration that works best for your student (test them out!). When you find the one that works best, make sure to click Apply, then OK. This will make sure the computer remembers your pointer preference.
Try these steps:
1. Click on Start button at the bottom of the screen. Move up to Settings, then to Control Panel and click. You should now see a window with many icons, including "Mouse":

2. Click on Mouse, then look for the tab Pointers.

3. Click on the down arrow under Scheme, then choose the pointer configuration that works best for your student (test them out!). When you find the one that works best, make sure to click Apply, then OK. This will make sure the computer remembers your pointer preference.
Monday, October 22, 2007
Accessing Windows Built-In Magnifier
Here's another great tip from Michael, along with directions to access Windows own Magnifier--did you know Windows provided this free little application for people who have limited vision?
Follow the directions below and see how it works for you/your student.
1. Press the “Windows” key on the keyboard, or left-click the “Start” icon located in the lower left corner of the computer screen.
2. Go to “All Programs”.
3. Go to “Accessories”.
4. Go to “Accessibility”. [Note: In Windows Vista it's called Ease of Access]
5. Left-click on “Magnifier”.
At this point two dialogue boxes will appear. The first is titled “Microsoft Magnifier”. This box simply describes the population that will benefit from its use. If you do not wish to see this message each time you access the magnifier, click the “Do not show this message again” box prior to clicking “OK”.
The second dialogue box is titled “Magnifier Settings”. Here you can choose your magnification level, up to nine times the size of the original. It also offers Tracking and Presentation options, including color inversion (i.e., reverse imaging).
You may resize the width of the magnification window, make it vertical rather than horizontal, or float it around the screen to a different location. Use the left-click option for this operation.
You can create a desktop shortcut by right-clicking the “Magnifier” icon before opening the program. Move to the right, and choose Send to--Desktop (Create Shortcut). Left click, and the Magnifier icon should appear on your desktop. You may rename it if desired by right-clicking on it and selecting “Rename”.
Note #1:
The magnifier comes in handy when using the built-in calculator, which has exceptionally small lettering on the function keys: + -* / =.
Note #2: The magnifier works with the High Contrast Settings.
Note #3:
Activating the magnifier tends to jumble the icons on my desktop. Be prepared!
Follow the directions below and see how it works for you/your student.
1. Press the “Windows” key on the keyboard, or left-click the “Start” icon located in the lower left corner of the computer screen.
2. Go to “All Programs”.
3. Go to “Accessories”.
4. Go to “Accessibility”. [Note: In Windows Vista it's called Ease of Access]
5. Left-click on “Magnifier”.
At this point two dialogue boxes will appear. The first is titled “Microsoft Magnifier”. This box simply describes the population that will benefit from its use. If you do not wish to see this message each time you access the magnifier, click the “Do not show this message again” box prior to clicking “OK”.
The second dialogue box is titled “Magnifier Settings”. Here you can choose your magnification level, up to nine times the size of the original. It also offers Tracking and Presentation options, including color inversion (i.e., reverse imaging).
You may resize the width of the magnification window, make it vertical rather than horizontal, or float it around the screen to a different location. Use the left-click option for this operation.
You can create a desktop shortcut by right-clicking the “Magnifier” icon before opening the program. Move to the right, and choose Send to--Desktop (Create Shortcut). Left click, and the Magnifier icon should appear on your desktop. You may rename it if desired by right-clicking on it and selecting “Rename”.
Note #1:
The magnifier comes in handy when using the built-in calculator, which has exceptionally small lettering on the function keys: + -* / =.
Note #2: The magnifier works with the High Contrast Settings.
Note #3:
Activating the magnifier tends to jumble the icons on my desktop. Be prepared!
Wednesday, October 17, 2007
How to Enlarge the Screen On a Mac
Well, most of our software for students who have limited vision or are blind is only for Windows computers. But what if you have a student who's in a classroom where there are only Macs available? If the computers have OS10.3 or above (you'll see a little blue apple in the upper left of the display), then here's what you can do for those students who have limited vision.
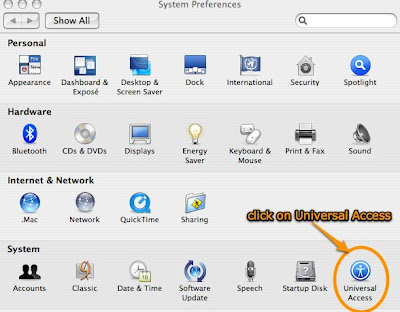
1. Click on the blue apple in upper left. Click on System Preferences.

2. Click on the Universal Access icon (blue circle with stick figure inside).
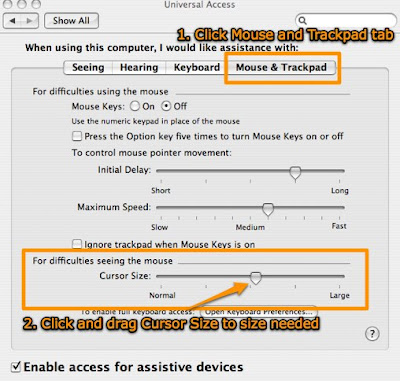
3. Click on Mouse and Keyboard (Trackpad for laptop) tab. Drag Cursor Size slider to the right to enlarge the cursor/arrow to desired size.
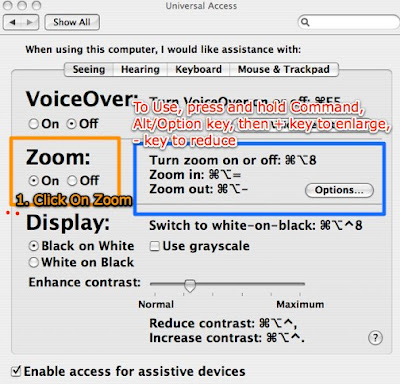
4. Click on Zoom (under "Seeing tab"). This turns it on, but you won't see any change on the display yet. To enlarge the display, press and hold the two keys to the left of the spacebar (alt/option and apple/command keys), then press the + key. To reduce the size, press the same two keys to the left of spacebar, then press the - key.
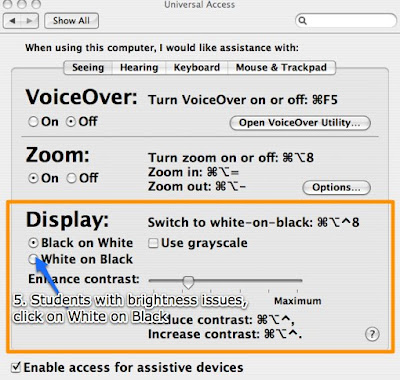
For students who need high contrast, you can click on Display (under Zoom option) and click on White on Black option. You can adjust the contrast with the slider.
Hope this works for you!
1. Click on the blue apple in upper left. Click on System Preferences.

2. Click on the Universal Access icon (blue circle with stick figure inside).

3. Click on Mouse and Keyboard (Trackpad for laptop) tab. Drag Cursor Size slider to the right to enlarge the cursor/arrow to desired size.

4. Click on Zoom (under "Seeing tab"). This turns it on, but you won't see any change on the display yet. To enlarge the display, press and hold the two keys to the left of the spacebar (alt/option and apple/command keys), then press the + key. To reduce the size, press the same two keys to the left of spacebar, then press the - key.

For students who need high contrast, you can click on Display (under Zoom option) and click on White on Black option. You can adjust the contrast with the slider.

Hope this works for you!
Sunday, July 22, 2007
Some Great Keyboard Shortcuts for Accessibility
Michael, a fantastic teacher in our VI (Visually Impaired) Program, gave me some great keyboard shortcuts to help make the Windows environment more accessible to students who are blind or who have low vision. He gave me permission to share his files, so I'm posting two of them here on the side of this blog: Keyboard Shortcut Commands and Word Shortcuts. My favorite from the Keyboard Shortcut Commands is setting for high contrast, helpful for some students who may be light sensitive: Access Windows High Contrast Settings: “Left Alt” + “Left Shift” +
“Print Screen”, then press OK. The screen will change to all black, with white text. If you leave the computer idle for a certain amount of time, it'll revert back to the regular screen, but if you need to change it back on your own, simply press the same keys as you did to start it. Thanks, Michael, and I'm continually in awe of the people in our program--I learn something new every day!
“Print Screen”, then press OK. The screen will change to all black, with white text. If you leave the computer idle for a certain amount of time, it'll revert back to the regular screen, but if you need to change it back on your own, simply press the same keys as you did to start it. Thanks, Michael, and I'm continually in awe of the people in our program--I learn something new every day!
Sunday, July 1, 2007
More on NECC and Universal Design for Learning
My days at NECC were filled with new terminology and resources to explore. I've spent the last few days delving into a little bit of the CAST website: Center for Applied Special Technology. Here's the opening paragraph at their website: "Universal Design for Learning (UDL) is a framework for designing curricula that enable all individuals to gain knowledge, skills, and enthusiasm for learning. UDL provides rich supports for learning and reduces barriers to the curriculum while maintaining high achievement standards for all."
I came to understand that UDL is helping to focus technology accessibility on people of all ages and abilities who have had difficulty learning in a traditional educational setting. To learn more about the concept of UDL, as well as some WONDERFUL resources, go to Dr. Dave Edyburn's handout for his NECC session about making text accessible.
One of the more intriguing concepts that Dr. Edyburn demonstrated was that of Cognitive Rescaling. In today's world of so much text to try to digest, he suggested that using Microsoft Word's AutoSummarize tool might help. Try it out: open a text document (or copy and paste paragraphs of expository text from a website), then click on Tools--AutoSummarize. The window offers several choices, including highlighting key points, or creating an Executive Summary, along with the percentage of the text to use. AutoSummarize does just that--summarizes the text. Imagine the possibilities for students who struggle with reading information at a more complex level than they can understand, and who are then just tuning out or turning off. In Dr. Edyburn's handout you'll find a clearer and more eloquent description of Cognitive Rescaling.
One website that was referred to often during discussion of UDL was Windows to the Universe. The About the Site link states: "Because we have users of all ages, the site is written in three reading levels approximating elementary, middle school and high school reading levels. These levels may be chosen by using the upper button bar of each page of the main site." Go take a look.
I walked away from NECC feeling eternally grateful that there are so many people out there who have a passion for a certain aspect of technology, and spend all their time focused on learning about that one aspect. For someone like me, who tends to feel overwhelmed by all the potential of the web, and often doesn't know where to begin, I just need to go to my del.icio.us bookmarks and find that one site that can help me with what I need to know today. I'm so grateful not to have to reinvent the wheel; the challenge is just to know where to find the tools to put the wheel together.
I came to understand that UDL is helping to focus technology accessibility on people of all ages and abilities who have had difficulty learning in a traditional educational setting. To learn more about the concept of UDL, as well as some WONDERFUL resources, go to Dr. Dave Edyburn's handout for his NECC session about making text accessible.
One of the more intriguing concepts that Dr. Edyburn demonstrated was that of Cognitive Rescaling. In today's world of so much text to try to digest, he suggested that using Microsoft Word's AutoSummarize tool might help. Try it out: open a text document (or copy and paste paragraphs of expository text from a website), then click on Tools--AutoSummarize. The window offers several choices, including highlighting key points, or creating an Executive Summary, along with the percentage of the text to use. AutoSummarize does just that--summarizes the text. Imagine the possibilities for students who struggle with reading information at a more complex level than they can understand, and who are then just tuning out or turning off. In Dr. Edyburn's handout you'll find a clearer and more eloquent description of Cognitive Rescaling.
One website that was referred to often during discussion of UDL was Windows to the Universe. The About the Site link states: "Because we have users of all ages, the site is written in three reading levels approximating elementary, middle school and high school reading levels. These levels may be chosen by using the upper button bar of each page of the main site." Go take a look.
I walked away from NECC feeling eternally grateful that there are so many people out there who have a passion for a certain aspect of technology, and spend all their time focused on learning about that one aspect. For someone like me, who tends to feel overwhelmed by all the potential of the web, and often doesn't know where to begin, I just need to go to my del.icio.us bookmarks and find that one site that can help me with what I need to know today. I'm so grateful not to have to reinvent the wheel; the challenge is just to know where to find the tools to put the wheel together.
Wednesday, June 27, 2007
Initial Thoughts About NECC 2007 in Atlanta
First, Wow! I've spent the last two days feeling overwhelmed and humbled by all the technology innovation I've seen going on here at NECC in Atlanta. I thought CUE was great, but this conference has blown me away. I started late and missed the first big day of the conference, so I needed a day to get oriented. I went to the keynote on Tuesday, which was great (most of the highlights you can get by going to the NECC website). A lot of the conference handouts are available online, and many of the sessions were podcast.
The rest of Tuesday, I spent wandering around the exhibits and the conference center. An interesting thing happened while wandering. I had been disappointed searching the conference website initially for sessions related to special education. Well, while wandering, I happened upon an area tucked away, called "The Playground", that had several tables set up with information on accessibility. Through discussion with one very enthusiastic young tech person from Florida, I found out that I had been using the wrong term for searching. I should have been looking under Universal Design. In my next post, I'll be writing more on the fascinating information I learned about Universal Design, which actually focuses on diverse learners of every kind. I have a lot of links to share, but today, I'll just give this one: Teaching Every Student in the Digital Age: Universal Design for Learning. This is a book that you can purchase, but is available online to read, as well.
One more link I want to share today, for anyone who'd like to get started learning more about Web 2.0 with an emphasis on Universal Design. It's called 90 Days of Summer, and is a calendar of links, one a day, to start exploring. Get started on this, and I'll have more links later!
The rest of Tuesday, I spent wandering around the exhibits and the conference center. An interesting thing happened while wandering. I had been disappointed searching the conference website initially for sessions related to special education. Well, while wandering, I happened upon an area tucked away, called "The Playground", that had several tables set up with information on accessibility. Through discussion with one very enthusiastic young tech person from Florida, I found out that I had been using the wrong term for searching. I should have been looking under Universal Design. In my next post, I'll be writing more on the fascinating information I learned about Universal Design, which actually focuses on diverse learners of every kind. I have a lot of links to share, but today, I'll just give this one: Teaching Every Student in the Digital Age: Universal Design for Learning. This is a book that you can purchase, but is available online to read, as well.
One more link I want to share today, for anyone who'd like to get started learning more about Web 2.0 with an emphasis on Universal Design. It's called 90 Days of Summer, and is a calendar of links, one a day, to start exploring. Get started on this, and I'll have more links later!
Monday, June 18, 2007
I've Only Just Begun!
I've learned so much from the Read/Write Web class these past few weeks. But, this is only the beginning. I'm teaching summer school this summer, and plan to use one of my blogs with my students. First, as a way to for my students to think and then respond to questions I may post. Second, as a way to learn and then practice how to use JAWS and Zoomtext (the screenreader, screen magnifier) to access those pages through keyboard shortcuts I'm teaching to the students.
In addition, I want to complete a thought I had had with my students this year: making a podcast with my students related to visual impairments. One idea was to talk about things that are 'pet peeves' for my students. One of my students said that he hates when kids and adults call his (mobility) cane a 'stick'. So, stay tuned and take a look at my webpage during the summer to hopefully listen to our podcast. Room B1
In addition, I want to complete a thought I had had with my students this year: making a podcast with my students related to visual impairments. One idea was to talk about things that are 'pet peeves' for my students. One of my students said that he hates when kids and adults call his (mobility) cane a 'stick'. So, stay tuned and take a look at my webpage during the summer to hopefully listen to our podcast. Room B1
Saturday, June 9, 2007
Podcasting Accessibility
I've had to experiment with posting podcasts to make sure that my students who are blind are able to listen to the shows. I've used GarageBand on a Mac, and then converted the files to iTunes files (with an m4a extension), then posted them at my webpage: Room B1
Since the speech software, JAWS, that my students use only works on PCs, I found that they were having difficulty accessing the files. So, using an online file conversion site called Zamzar (www.zamzar.com), I converted the files to mp3, which can then be played using Windows Media Player or Real Audio. My student who is blind and in 4th grade is now able to listen to the files at home. He is more tech savvy than many of his general education peers!
I find that it's a constant challenge making sure that projects we do are accessible to my students. I know that accessibility is also an issue for people who have hearing impairments. A suggestion for teachers who podcast is to post the text document along with the podcast. I learned this through an online class I took about accessibility and the web. I'd be interested in hearing other suggestions to help make the Web 2.0 as open as possible to all who surf it.
Since the speech software, JAWS, that my students use only works on PCs, I found that they were having difficulty accessing the files. So, using an online file conversion site called Zamzar (www.zamzar.com), I converted the files to mp3, which can then be played using Windows Media Player or Real Audio. My student who is blind and in 4th grade is now able to listen to the files at home. He is more tech savvy than many of his general education peers!
I find that it's a constant challenge making sure that projects we do are accessible to my students. I know that accessibility is also an issue for people who have hearing impairments. A suggestion for teachers who podcast is to post the text document along with the podcast. I learned this through an online class I took about accessibility and the web. I'd be interested in hearing other suggestions to help make the Web 2.0 as open as possible to all who surf it.
Subscribe to:
Posts (Atom)